Connecting to DynamoDB using the debug hub

Modify the debug hub to create a connection to the DynamoDB table.

In my last post I showed you how I created a new table in DynamoDB.  Now it’s time to access it, and then the contents to our Debug Hub.

In order to do so I will need the AWS SDK (software development kit) installed in my project.  You can find the details here :

https://www.npmjs.com/package/aws-sdk

Just install it into the debug hub project.

sudo npm install aws-sdk

So I’ve extended the index.html page of the Debug Server to allow a new item in the sidebar, pointing to a newly create html page.  I called it “Dynamo DB”.

Schermafbeelding 2017-01-31 om 19.12.42.png

I will be connecting to the service with my own credentials.  That is : the credentials I created in my last post, the “smartmirror” user.

Schermafbeelding 2017-01-31 om 20.37.46.png

To do this efficiently, I will create a new JSON file in the root of my project.  In it, I will have to specify the following things :

  • The Access Key ID.  Information I got when creating the user.
  • The secret Access Key.  Also obtained after creating the user.
  • The region.  Very important.
  • The endpoint : the URL at which the AWS service can be reached. Notice how the region is part of the endpoint as well.

If you want to know the region, you can check out the details of the table created in DynamoDB.  It has a unique ARN (amazon resource name).  In it, you can see the code of the region you’re in.

Schermafbeelding 2017-01-31 om 19.43.55.png

So now for the code.  I will start by editing the dynamodb.html file to add a button and a grid.  The button will start a function that retrieves the data from the table. The grid will display the result.  This is quite straight forward.  We did that before when creating the page for the debug server.

Schermafbeelding 2017-01-31 om 20.37.25.png

Notice how I called the button “getcommands”.

The code is visible in the screenshot below.

Schermafbeelding 2017-01-31 om 20.37.39.png

There are some things to be said about this code.  At the bottom you can see the jQuery statement linking the button to the getCommandQueue function, which will do all the dirty work.

This function first requires the “aws-sdk” module, which we installed earlier.  It then configures it using the JSON file we created.  This way we can configure the connection with one single statement instead of having to set the access keys every single time.  That wouldn’t be very secure either.

Next a new variable is created called “params”.  This is an object that will be sent along with the query, and contains all the information needed to get data from the table :

  • The table name
  • An expression showing a filter
  • A mapping to the correctie field
  • A mapping to the correct value

the condition has a syntax whereby the field is represented by a placeholder prefixed with a # symbol, and a value placeholder prefixed with a : symbol.

These placeholders are resolved in the next 2 attributes of this parameter JSON : we map the column to the “Session” attribute, and we map the value to hardcoded “1234”, which is the key I specified when creating a record in the table.

And next, we’re all good to go.  The query method is called of the docClient object which is responsible for the communication with the DynamoDB  service.  The param is passed along, and there’s also a callback function.  It has 2 parameters.  When an error is returned, the “err” parameter will contain the details of the error.  When the call is successful, the data will be in the “data” parameter.  With this “data”, a foreach loop is executed, and it adds the result to the table.  The AddRow function can be seen below.

Schermafbeelding 2017-01-31 om 21.53.17.png

That that’s it.  Below is the result of this endeavour.

Schermafbeelding 2017-01-31 om 20.35.04.png

Good Luck!

Creating a DynamoDB Table

Steps to create a new table in DynamoDB, and populate it with some values.

Now it’s time to get cracking with DynamoDB.  DynamoDB is one of the services you can use with Amazon Web Services.

In order to access these, just go to http://aws.amazon.com.

If you’ve registered for it, you can log into the console at the top right hand side of the screen.  Once you did that you will see your console.  The top of the page will look a bit like the screenshot below.  I’ve added some extra buttons at the top, but what’s important is the region at the right hand side of the screen.

Schermafbeelding 2017-01-31 om 21.08.34.png

With me it’s set to “Oregon“.  Which was the default when I logged on.  It’s important you keep it at this one.  If you go and use one of the services in this region, and you switch to another region later on, you won’t see the tables you created for example.  Also, not all services are available in all regions.  So keep that in mind.

But before I begin, I want to create a new user that is able to connect to the service.  You can do that in another service called “IAM“.  Locate the IAM service in the services overview you can find by clicking the “Services” dropdown at the top left hand side of the screen.

Schermafbeelding 2017-01-31 om 19.13.16.png

In the screenshot above you can see my recently used services, and IAM is one of them.

If select it, you are able to create a user.

Schermafbeelding 2017-01-31 om 19.00.05.png

I will go ahead and do so by clicking the “Add user” button.  The system prompts me for a user name and I’ll call it “smartmirror“.

Schermafbeelding 2017-01-31 om 19.00.39.png

I made sure sure to click the “programmatic access” type in order to be able to connect with it from an external application.

Next, you’re able to give the user some permissions.

Schermafbeelding 2017-01-31 om 19.01.59.png

There are 3 ways to do so : by adding him to a group, by copying existing permissions, or by attaching policies.  I will choose the last one and search for the “AdministratorAccess” policy.  This will allow the user to do everything including create and drop tables, insert, query, etc.  Just click the checkbox and confirm.

When the process is complete you will see an overview like the one you see in the screenshot below.

Schermafbeelding 2017-01-31 om 19.02.32.png


You can see the user got a unique access key ID, and a secret.  These 2 things, we can use to connect to the mirror using the “smartmirror” user credentials.

Ok, so now it’s time to create a new table.

In fact, before doing so, you should familiarise yourself with the concept of a NoSQL database, because that’s what DynamoDB is.  It is very different from a relational database like the most of you will know in that sense that it is not optimised for storage, but rather for read speed.  In order to accomplish this, it uses a different technology in which the rows (or items if you want to call them) are stored in a JSON format in tables.  Unlike relational tables these tables hardly have a fixed structure.  The structure of the table can vary row per row (or item per item if you will).  Just google it, or watch some video tutorials on it.  Digging deeper is beyond the scope of this blog post.

So, go back to the console and this time choose the DynamoDB service.  If all is well you should get to a welcome page where you will be prompted to create your very first table.  Just click that button, and the page you will see next will resemble the one below.

Schermafbeelding 2017-01-31 om 19.16.17.png

You will have to choose a table name.  I called it “CommandQueue”.  This is the table in which I will store the commands issued to Alexa, and which are to be sent to the mirror.  Or rather, for which the mirror will poll.

I have to specify a partition key.  This is the primary key of the table.  I can also add a sort key, but that’s about it when it comes to metadata.  I call them “Session” and “Timestamp”.  Also keep the default settings activated, and click create.  The details of what a partition key and a sort key is, is beyond the scope of this article, so please google to get more information on the NoSQL principals for more info.

If all is well, that will bring to the the AWS DynamoDB console.  The interface will look similar to the screenshot below.  You can see the table was created, and there are currently no items in it.  Check it out by clicking the “Items” tab at the right hand side of the screen.

Schermafbeelding 2017-01-31 om 19.16.59.png

We will go ahead and add a new item.  In the interface you will be able to give a value for the Session and Timestamp attributes, but I can also add other parts, as I will do here.  I will add a “command”, as a string value, and set it to “HIDE-ALL-MODULES”.

Schermafbeelding 2017-01-31 om 19.19.01.png

Check out the result below.

Schermafbeelding 2017-01-31 om 19.19.11.png

Allright.  All ready now to start reading from the table.


Amazon web services

Registering with Amazon Web Services to get the most out of the mirror.

After discovering our minor setback in my last post, I had to find a way to get Alexa to notify the mirror application when a command was issued (or a question was asked), without using the Java Client.

Turns out you can add your own extra “skills” to Alexa.  What Amazon calls a “Skill” is extra functionality you can write yourself, and add to the portfolio of Alexa commands you can ask the mirror.  In order to do that we need to get an account to the Amazon Web Services (AWS).

You can register for this using your developer account at the URL below.

https://aws.amazon.com

Aws offers a broad range of online services, some of which are free, and some of which are priced.

From the Aws portal site you can create a free account.  You can sign up for it at the top right of the window.

aws-create

Doing so is quite a straight forward process.  You have to supply your name, email, etc.  But you also have to enter your credit card number.

Even though we will be using the so called “Free Tier” of AWS (services that aren’t charged for) you have to enter a valid credit card number.

It’s also important you enter a correct phone number. In order to verify your identity Amazon calls you when finishing up the sign up process.  It is an automated voice controlled computer asking you to enter a pin number.  After completing the process you can access the services from the Aws Portal.

The service we’ll need to add extra skills to our mirror is called Aws Lambda.

lambda

In short: it’s just a place where you can paste some code (Javascript, perl, and even c#) that will be executed in the cloud.  This code is referred to by the custom skills that can be created with Alexa.  After all, all custom skills do is call a web service somewhere.  This web service can also be some service started on your own hardware.  However, in my case, i’m not on a fixed IP with my internet provider, so it’s kind of hard to host a web server with one or more services attached to it.  Furthermore, I have to maintain it, and make sure it’s “always up”.

Using the lambda services you get server time on one of the servers of Amazon, executing that piece of code every time you ask it to.  Simple as that.  The service is free… at least, almost free.  You get 1.000.000 free calls per month.  That’s one million.  1 with six zeroes.  That’s a whole lotta command to ask the mirror in one month.  Basically, it means: free.

You can find some more extra free features at this URL : https://aws.amazon.com/free/

Extra storage, computing time and database hosting, basically for free.  Some paying services are free up to 12 months.

A second service we will be using is the DynamoDB service.  This is a service which is also included in the “Free” tier.  The screenshot below shows the details.

schermafbeelding-2017-01-30-om-23-02-16

According to me, quite enough to handle our requests.  So basically : free.  That’s great.

My intention is fairly simple.  I will be writing the details of the commands to a table in DynamoDB, in some sort of queue.  This queue can then be polled by the mirror. Furthermore, I will be able to maintain a log of all queries, and some stats on the mirror.  These are some nice extra perks.

Someone on the Magic Mirror portal also pointed me towards a solution somebody else made using the AWS IoT service (Internet of Things), in which I would have to register the Raspberry Pi as a device to be addressed in order to execute commands I send it.  In the end it would probably be a good solution, but when browsing the pricing model I saw it was free up until 12 months.  According to not a durable solution, so I’m going for the DynamoDB solution because it provides me with more extensive features, and can plug in to my existing architecture.

Let’s get cracking!


A minor setback

Discovering that getting non-audio feedback is not supported using Alexa Voice Services.

Now it’s time to get the feedback from Alexa to our mirror. I have been browsing the the Java code of the AVS Java client, but I didn’t find something really conclusive on how to get the content of the response.  So I’ve been browsing the Amazon developer forums.

You can get access to the Amazon forums if you have an Amazon developer account.  Just surf to http://developer.amazon.com to get an account.

After some careful research I was faced with a major disappointment, and frankly a minor setback.

I found several forum posts stating that getting the feedback in the form of a card (which is the content being displayed in an app if you create a companion app for example), is not available using Alexa Voice Services.  It seems that an enhancement request has been logged to add this functionality, but the most recent post on this dates from a few days ago (we’re talking January 2017).

I’ve posted the links to the forum posts below.

https://forums.developer.amazon.com/questions/10444/how-to-get-the-non-audio-data-from-the-alexa-skill.html

https://forums.developer.amazon.com/questions/10871/avs-card-data.html

https://forums.developer.amazon.com/questions/54337/voice-service-meta-data.html

So, it’s time to get creative.  Keep you posted in my next articles.

Visual feedback using matrix effect

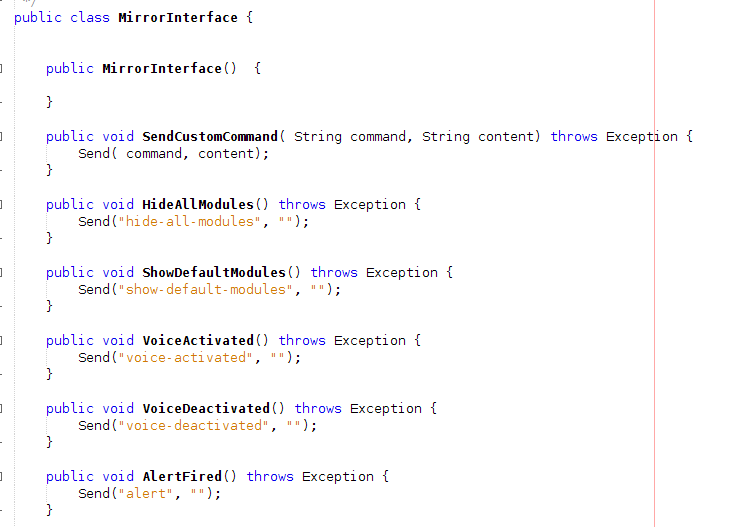
Explaining a new MM module called the matrix effect allowing visual feedback on the mirror while alexa is listening.

Now the mirror can detect when Alexa is listening to our voice input, it’s time to provide a visual feedback on the mirror.  We could just do that using an alert or an extra module that displays a text.  Instead I want to do something fancier.

It’s time for a small side project in the form of a new magic mirror module displaying a female head in a “matrix” effect, just like in the movie with a bunch of green falling letters hinting a silhouette.  I’m saying green because I’m kind of preconditioned, but it can be any color anyway.

The idea behind this module is to create a JavaScript routine that would generate the the letters on a canvas.  But I want it to be a bit more generic, so other magic mirror owners would be able to download the module and display something else instead of a human head.   So the solution to that would be to make a configuration file, and store all the settings in the configuration file, and refer to it in the mirror’s config.js file.  So I went ahead and created the js file, the node helper and a subfolder for configuration files in json format :

Schermafbeelding 2017-01-29 om 23.18.43.png

Now for the module itself.  Below you can see an extract of the code of the javascript file.  most important is the start function here.

Schermafbeelding 2017-01-29 om 23.17.22.png

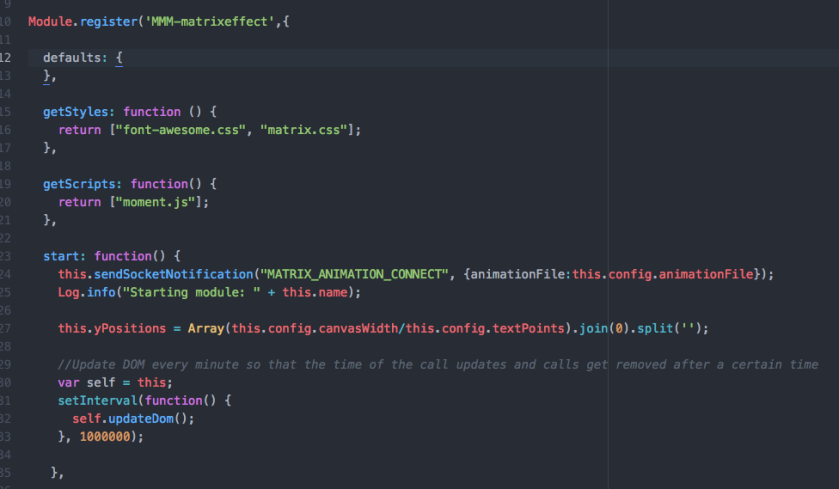
The first line in this function is crucial.  The setting for this effect are stored in the “alexa.json” file in the “effects” sub folder.  In order to be able to use the settings, the json file needs to be read.  However, access to the file system is not something you can do in JavaScript for the obvious security reasons.  That’s something that needs to be done with some server side scripting.  That’s where the node helper comes in.  Essentially, we need to tell the node helper to get the settings from a certain configuration file, which I called an animationFile in the code.  I deliberately called it an animation file because – in due time – I want to be able to animate it in multiple frames.  But for now, a single frame will do.

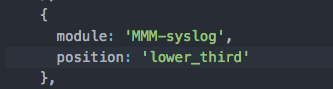
The name of the animation file is stored in the magic mirror’s configuration file :

Schermafbeelding 2017-01-29 om 23.22.42.png

Specifying it in the config tag means that it can be addressed from the JavaScript file using the “config” member.  This piece of information is passed on as a payload in the “MATRIX_ANIMATION_CONNECT” notification.  This notification is caught in the node helper like this :

Schermafbeelding 2017-01-29 om 23.19.02.png

Notice how, in the code extract above, the animation file is loaded using the loadAnimationFile method.  This called whenever the MATRIX_ANIMATION_CONNECT notification is received.

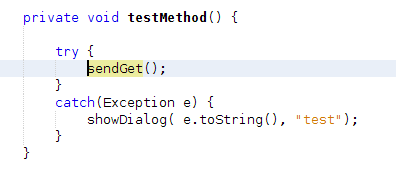
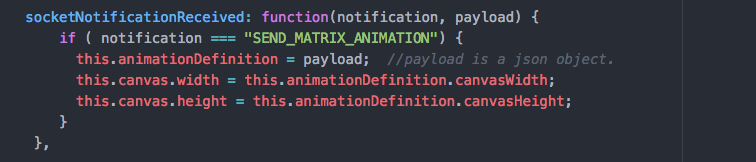
Never mind the test code in the screenshot.  I used it to know what the relative path to the animation file needed to be.  I’ll remove it in the actual code.  Once loaded it is being sent back using a notification using the “SEND_MATRIX_ANIMATION” constant.  This is received in the JavaScript file like this :

Schermafbeelding 2017-01-29 om 23.17.29.png

Notice how a local variable is assigned to the payload.

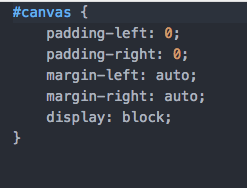
Another thing you can see in the JavaScript file is the initialization of an array called yPositions . We will by using this array in our JavaScript method that displays the matrix effect on the mirror.  It is initialized with a number of zeroes.  The size of the array is a calculation.  It divides the width of the canvas by the size of the font to calculate the exact number of columns there need to be in the matrix effect.  One last thing worth mentioning here is that I’ve created a custom .css file that contains some properties of the canvas.  It is referenced in the “getStyles” function, and looks like this :

Schermafbeelding 2017-01-29 om 23.18.51.png

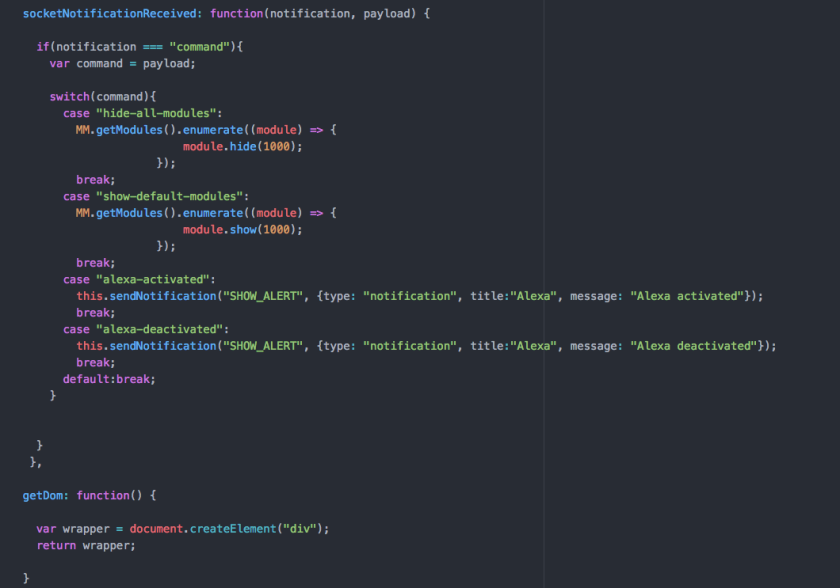
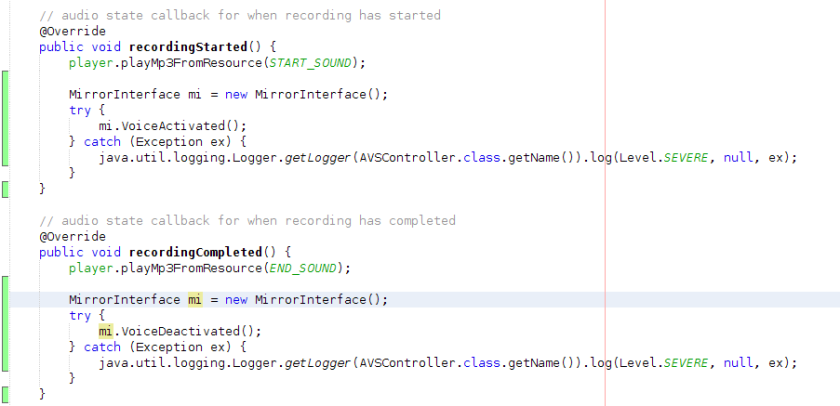
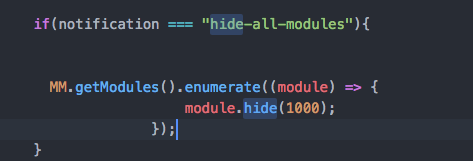
In order to start and stop the matrix effect, the module relies on another module telling it to start and stop.  In practice this will of course be the Alexa interface module doing this.  It listens to 2 different notifications : START_MATRIXEFFECT en STOP_MATRIXEFFECT.  The first one hides all of the modules except for the matrix effect module, shows the module itself, and starts the matrix using the animation definition and the yPositions array.  The second one does the exact opposite.

Notice how “notificationReceived” is something else as “SocketNotificationReceived”.  The first one is used from communication between modules, the second one is use for communication between the JavaScript file and the node helper.

Schermafbeelding 2017-01-29 om 23.17.39.png

The screenshot below shows a very simple piece of code overriding the getDom method by creating a HTML canvas, and getting the context from it.  These objects are used to draw something on a HTML page.  You can find more information on this here.

Schermafbeelding 2017-01-29 om 23.17.47.png

The code extract below is the bulk of the module and requires some detailed explanation.

Schermafbeelding 2017-01-29 om 23.18.30.png

The runMatrix function actually starts an interval.  This is a piece of code (executed as a callback function in the call to the “setInterval” method, which is executed every x milliseconds.  These milliseconds are also a parameter in the same method, and as a matter of fact it is controlled by the “updateSpeed” parameter of the animation definition.

The function starts by getting the canvas and the context and filling the screen with a black background.  I haven’t made this variable yet, but I might do so in the future.  Inside the callback function the canvas and the context are set again because the scope of the callback function is different.  A matrix variable is created, containing the different column definitions in the animation file.  Next, the random() function is called.  It returns a random number between 0 and 1.  I use it to determine if and when an almost transparent overlay is to be put over the existing area.  Almost transparent, as you can see, the “alpha” of the rgba function component is 0.01.  This takes care of the fading letters in the matrix effect.

Next the font is set to the primary color (secondary colours are not supported yet) and the font is determined to be a certain font name with a certain width, depending on the animation file.  The next function is very important.  The map function loops through the yPositions matrix and executes a callback function for every element.  Where y is a coördinate on the y axis of the canvas and index is the index of a certain column.  The for loop determines if a letter is to be printed because it is in between the “start” and “end” tag of a section.  If it is, the text is printed on the y coördinate passed by the map function and the x coördinate based on a formula on the index.  Lastly, the yPositions array is updated so the letters drop to the bottom.  If they reach a certain depth, the yPositions array at that index is just rest.

The stopMatrix function just clears the interval allowing the loop to stop.

All this is configured in the animation definition.  It looks like this :

Schermafbeelding 2017-01-29 om 23.22.53.png

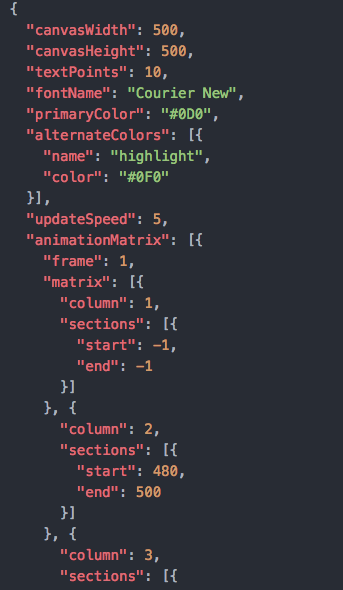
The configuration file is “prepared” to do some more exotic things like working with different colors and different animation frames already.  The code doesn’t use these properties yet.  Notice all of the settings used in the code like canvasWidth and canvasHeight, textPoints, etc.  The animation Matrix is a matrix in 3 dimensions :

  • Dimension 1 is the animation frame.  There’s only one in this example
  • Dimension 2 is the matrix contain all columns
  • Dimension 3 is an array within the column telling the mirror to either draw or not draw a letter depending on the start and stop number of pixels.  Remember, that the counting of the pixels starts from the top to the bottom.  Even though there is a “frame” attribute and a “column” attribute, the JavaScript code expects both the frames and columns to be in the correct order.  The “frame” and “column” attributes are ignored in the code, but serve as a pointer to the person creating the configuration file.  Specifying a start and end of -1 will make sure nothing is displayed in that particular column.

When running this module, the end result looks like this :

matrix-effect.gif

Granted, it still needs some work finetuning this.  And I’ll probably need to make a little tool to be able to create the animation definition file more efficient, but that’s for a later phase.

When this module is in a more finished phase I will upload it as a magic mirror module.


Creating the MMM-alexa-interface module

Creating my own module to act as a proxy for incoming alexa feedback.

So, for my next step I’ll be creating my own module, acting as the proxy for the Alexa feedback.  All it’s supposed to do is capture the commands and the content sent by Amazon, and act accordingly… based on some configuration of course.

So the first thing to do is create an extra folder, and create a .js file and a node helper.  You can find all the info about that in the Magic Mirror Builders section on creating your own module here.

The result in Atom looks like this :

Schermafbeelding 2017-01-27 om 18.54.48.png

So, below is the contents of my js file.  I’ve implemented a very simple start function.  Just updating the DOM every minute.

Schermafbeelding 2017-01-27 om 18.55.04.png


What’s more interesting is the socketNotificationReceived override.  This function receives all communications from the node helper of the function. The node helper is the file where you can specify your server side code.  You can communicate with the javascript file handling the front end story using sockets.  All I do in this function is handle all of the commands I’ve specified up until now.  You can se how the “hide-all-modules” and “show-default-modules” handle the showing and hiding of the modules using the MM variable.  Furthermore, I’ve implemented the “alexa-activated” and “alexa-deactivated” commands by sending a notification to the alert module I’ve installed on the mirror.  All it’s supposed to do is show an alert of type “notification”, and show a matching title and message.

Schermafbeelding 2017-01-27 om 18.55.11.png

The node helper code is fairly simple.  The start function override just starts a routing from the express framework, just like in our tests before.  All it does is send a socket notification to the front end where it is handled.

Schermafbeelding 2017-01-27 om 18.55.22.png

All we need to do now is add it to the configuration of the mirror like in the screenshot below. I’ve got no specific settings up until now, it’s also fairly simple.

Schermafbeelding 2017-01-27 om 18.54.29.png

Starting up the debug hub, and pressing the buttons.  Here’s the result.  Exactly what I was hoping for.

alexamirrorcomm.gif

Good luck!


Signalling the mirror when Alexa listens

Editing the Java Client code to send messages when Alexa listens.

In this article I’ll be showing you the steps I took to signal the mirror when Alexa starts and stops listening.  Well, actually, I’m not alerting the mirror just yet, I’m sending a message to the debug hub.

In my last post I showed you how I was able to make a connection from the Java client to the debug hub using HTTP.  That’s great, but it was a quick and dirty solution.  We’re going to make this a bit more robust. I’ll start by adding a new class the the com.amazon.alexa.avs package, and call it “MirrorInterface“.  You can see it near the bottom of the screenshot:

Schermafbeelding 2017-01-25 om 20.19.02.png

The content is pretty simple.  I’ll be using the code to send the message and encapsulate it into a private method like so :

Schermafbeelding 2017-01-25 om 20.18.27.png

Notice how I already added support for both a command and extra content.  For now I’ll be focussing on only a command.  Also, the URL is added hardcoded too.  I plan on reading this from a config file, but that’s only a “nice to have” right now.

I intentionally made it private as the public methods all refer to this one.  I created a few, each serving their own purpose :

Schermafbeelding 2017-01-25 om 20.18.08.png

Notice the “VoiceActivated” and “VoiceDeactivated” methods.  I’ll be incorporating them in the code of the Java Client.  If you look in the “AVSController” java file you will see the following method overrides : “recordingStarted” and “recordingEnded”.  They get called whenever Alexa starts to listen, and stops listening.   That’s where I’ll be adding my code :

Schermafbeelding 2017-01-25 om 20.17.29.png

And that’s it.  I issue a question to Alexa, and voila, the result in the debug hub.

Schermafbeelding 2017-01-25 om 20.17.14.png

Create a connection from the Java Client

Setting up a quick test for the connection between the Java client and the debug hub.

It’s time for the next phase in the project.  So far we’ve primarily focused on the “output” side of the story : displaying stuff on the mirror.  Now we’re going to focus on the “input” : accepting voice commands from Alexa Voice Services.

In this article I’ll be attempting to send a message from the Java client to the debug hub.

I’ll be very practical on this one, nothing too fancy.  I’ll be using one of the buttons on the window of the client to start a request.

I added all of this code to the AVSApp.java file.

First, import some packages I’ll be using in the new code.

Schermafbeelding 2017-01-23 om 00.04.59.png

After some browsing, I found out that the “createMusicButton” method is responsible for adding the music buttons to the interface.  I’ll be using one of those buttons to simulate.  Below, you can see I commented out the default handler, and added my own call to the testMethod() method.

Schermafbeelding 2017-01-23 om 00.05.53.png

This method is fairly simple.  It just calls another message to do all the dirty work.  I added this level of indirection, because ultimately I want to separate the logic for the mirror interface.  There’s just some basic error handling involved here.

Schermafbeelding 2017-01-23 om 00.05.59.png

Below, you can find the actual message responsible for sending the command.

Schermafbeelding 2017-01-23 om 00.06.05.png

In the above code extract you can see a new URL object is created pointing to the static IP address of my Mac where the debug server is running . Port 3000 is the port it is listening on.  I added the path of the routing, and specified the “GET” method.  The rest of the code is basically some plumbing code to read the response from the debug hub.  In practice, hardly anything will happen with this response, because the Java client will have no visual feedback, apart from logging to the console.

Of course, the above code is very rudimentary.  I will have to refactor the code to be a more robust package in which I can call the get method with multiple parameters in multiple circumstances, and where the connection, for example, is read from the config file.  But all in due time.

Below, you can see what happens when I click the button.

javaclient-connction.gif

Good luck!

Showing incoming messages in the debug hub

Adapting the debug hub to show incoming messages as they arrive.

In an earlier article I showed you how I set up the debug hub to accept external requests.  I did that just to control what was coming in as information, so I could program and configure the mirror accordingly.

This article show you how I set up a method to also see the incoming messages as they arrive.

Open the debug server page, and see how I added a table at the bottom.  It already contains a header, and I gave it an Id “message-table”.

Schermafbeelding 2017-01-22 om 19.48.51.png

Notice an extra function called AddRow with a jQuery statement adding a command and a content row to the table.  You can see the result below.

Schermafbeelding 2017-01-22 om 19.49.52.png

Below is this setup in action . I send a message just using my browser, and see how it appears in the list.

ezgif.com-video-to-gif.gif

Cheers!

An alternative using a module

Using a module to allow interaction between external applications and the mirror.

Ladies, and gentlemen.  It seems that I have gone too fast in my conclusions.  I was under the impression that the only way to allow external interaction to the mirror is by adjusting the core code.  That’s why I did some adjustments to the core code in this article.

Turns out I was wrong.  And i’m happy to admit it really.  The kind people at the magic mirror community pointed out to me that it might be better to create my own module to allow mirror commands.

Check out the forum for great support!

https://forum.magicmirror.builders

Someone pointed me to an existing mirror module, which you can find in the URL below.

https://github.com/paviro/MMM-syslog

Thank you very kindly for that!

Let’s check this out.  First get it from GitHub into my “modules” subfolder of the smart mirror root folder.

git clone https://github.com/paviro/MMM-syslog.git

I’ll be adjusting the mirror configuration.  Kick out the compliments module, and add the new one.  And restart the mirror.

Schermafbeelding 2017-01-22 om 10.54.54.png

The documentation of the module states that the only thing to do is send a message with the following syntax :

http://MIRROR_IP:MIRROR_PORT/syslog?type=INFO&message=YOUR_MESSAGE

Let’s try.  Start a browser and …

Schermafbeelding 2017-01-22 om 10.54.21.png

Yeeha.  A popup.

Schermafbeelding 2017-01-22 om 10.54.29.png

And a log in the middle of the screen.

Schermafbeelding 2017-01-22 om 10.54.34.png

How wonderfully easy is this.

Now to check out how this works, and how we can adjust it to make the same hide and show functionality as in the core adapting solution.

First, some reading in the Magic mirror module documentation.  I should have done this with some more attention earlier, but hey… sometimes I want to go too fast.

https://github.com/MichMich/MagicMirror/tree/master/modules

In here, the concept of node helpers is discussed. And it is what it is : a helper .js file where some node.js code can be created to support your module.

I found an example of hiding mirror elements in the following :

https://forum.magicmirror.builders/topic/778/mmm-voicehttps://github.com/fewieden/MMM-voice/blob/master/MMM-voice.js

By the way : this is a module allowing voice control!  Something to check out further, but as far as I can see it only takes a few mirror related commands.  The advantage of using Alexa is also there of course (you can ask here whatever you want).  It might be something to add 2 wake words like “alexa” and “mirror” or something, but there are pro’s and cons in here.  But I digress.

I’ll be adjusting the MMM-syslog code, in the place where a message is received, and is being display I’ll add my own temporary test code:

Schermafbeelding 2017-01-22 om 11.45.10.png

Just check for a different notification, and execute the code the hide the modules.

Next, adjust the node helper with another express routing as below :

Schermafbeelding 2017-01-22 om 11.45.44.png

It basically almost copies the existing code, but instead of sending a message in the notification, it sends the “hide” command.  And that’s it.  No core adjustments needed anymore.

Why is this working?  Well, the combination of the ability to access this.ExpressApp in the node helper, the MM availability in the module and the native notification features make everything possible that was possible using the core adapting solution.


Now, to hook things up again, so it can be used in conjunction with the debug hub.  I’ve commented away the app.get function in server.js.  Just to make sure there are no 2 handlers for the same routings.  And added this to the node helper of the MMM-syslog module :

Schermafbeelding 2017-01-22 om 12.59.56.png

Adding this to MMM-Syslog should do the trick.

Schermafbeelding 2017-01-22 om 13.00.15.png

And here’s the result.

show-hide-via-MM.gif

I will be moving forward with this approach, as I think it has more potential.  I won’t be demonstrating it in this article, but I’ll comment away the core code I added in this article.

Thanks again to the community to point this out.  Keep you posted!